Daniel J. Lewis

Internet entrepreneur, award-winning podcaster, podcast consultant, keynote speaker

  • RSS
  • X
  • Facebook
  • LinkedIn
  • Pinterest
  • Snapchat
  • Instagram

Powered by Genesis

How to use Amazon tracking IDs to measure separate affiliate income

August 29, 2014 by Daniel J. Lewis 29 Comments

Amazon associates affiliate page

If you have multiple websites, you should track each site's affiliate income separately with Amazon tracking IDs. Here's how, plus helpful WordPress plugins

This assumes you already have an Amazon Associates account.

Why separately track Amazon.com affiliate earnings?

If you try to monetize multiple websites—blogs, podcasts, communities, and such—then you need to see how each site is performing. Is your personal blog earning any money from its affiliates? Do people buy your recommendations from your podcast?

When you look at your Amazon.com affiliate report or see the payout, you will initially have no idea what earned that income. With separate Amazon tracking IDs for each site, you could segment your earnings easily and automatically.

Why not create separate Amazon affiliate accounts?

volume_rates_table._V192206938_

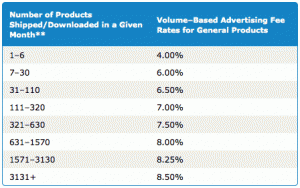
The more sales you refer, the higher your Amazon.com commission rate goes. You start at 4% and can earn as much as 8.5% in most categories, based solely on the number of products you sell through your affiliate links. (You earn commissions from any product someone buys after visiting your link, even if it's not the product you recommended.)

If you have ten websites each with their own Amazon.com affiliate accounts, then each website needs to refer enough volume in order to reach higher commission rates.

Separate accounts also mean logging in and out of Amazon.com in order to track each account's performance. This becomes even more cumbersome if you use international Amazon affiliate programs (like Canada, United Kingdom, and others).

But it's entirely possible and easy to use a single Amazon.com affiliate account (one per country) to track multiple sites. When you do this, the sales volume from each site contributes to your total sales volume, and can potentially bump you into higher referral rates. (I average a 7% referral rate from most of my sites.)

All you need to do is create separate Amazon tracking IDs.

How to create Amazon tracking IDs

Add Amazon Tracking IDs

  1. Login to your Amazon.com (or other Amazon domain) affiliate account.
  2. In the upper-left corner, under the logo, click “Manage” next to “Tracking ID.”
  3. You'll see a list of all your tracking IDs here. Click “Add Tracking ID.”
  4. Enter the ID you want to use. I recommend your domain without the “.com” or similar. If you're making similar tracking IDs for the separate international Amazon affiliate stores, then I suggest adding the Amazon's top-level domain (TLD, the “.com,” “.ca,” “.es” part). For example, my USA affiliate idea for my personal blog is “danieljlewis”; for Canada, it's “danieljlewisca”; for the United Kingdom, it's “danieljlewisuk”; and so on. Amazon will add the appropriate “-20” or similar number.

It doesn't cost anything to make extra tracking IDs. Income from all of your separate tracking IDs contribute to your core affiliate earnings, so you may earn a higher commission rate.

How to create Amazon affiliate links with separate tracking IDs

When you have your separate Amazon tracking IDs created, you can select it from the Amazon associates page, or when you create a link with the Associates toolbar on the main Amazon site.

Amazon associates toolbar

To confirm that you're using the right tracking ID, look for “tag=AFF_ID-20” in your embed code or link URL. Where “AFF_ID” is your tracking ID. This is what you would change if you need to fix old URLs or accidentally used the wrong ID in a new URL.

Making easy Amazon affiliate links in WordPress

For even more power and faster affiliate-link creation on WordPress, I recommend EasyAzon Pro and Fresh Bundle Master. Watch my video, from The Audacity to Podcast, to learn more about setting up and using these powerful plugins.

How to track separate affiliate earnings

After you have your separate tracking IDs created and implemented across your properties, you can start tracking the separate earnings in your Amazon affiliate account.

To view separate tracking ID performances together

Amazon tracking ID affiliate report

  1. Login to your Amazon affiliate account.
  2. Go to “Reports” > “Tracking ID Summary Report.”
  3. The report defaults to “Yesterday,” but you can select a different time period.

To view separate, detailed reports

Amazon associates tracking ID selection

  1. Login to your Amazon affiliate account.
  2. View any report.
  3. In the upper-left corner, under the logo, select the tracking ID you want to view.
  4. Just below the previous step, uncheck “Combine reports” (this option is only visible on a report page).
  5. View the homepage or any report you want to see just the tracking ID's performance.

To combine all tracking IDs in reports

  1. Login to your Amazon affiliate account.
  2. View any report.
  3. In the upper-left corner, under the logo, check “Combine reports” (this option is only visible on a report page).
  4. View the homepage or any report and you'll see all tracking IDs combined.

Look for this feature with other affiliate programs

Many other affiliate programs, such as Commission Junction, allow you to set similar tracking IDs. They may be called websites, campaigns, or something else.
Filed Under: Business, Money, Technology Tagged With: affiliates, Amazon.com, EasyAzon Pro, Fresh Bundle Master, WordPress, WordPress plugins

5 ways to save money traveling

August 22, 2014 by Daniel J. Lewis Leave a Comment

Photo Credit: ljcybergal via Compfight cc

Travel can be both fun and tiring. But don't let it be financially stressful! Here are five easy ways to save money traveling.

As an entrepreneur, I now get to travel and speak a more conference, which I absolutely love doing! Contact me if you'd like to have me speak at your event!

But travel can be expensive and I choose to live frugally. So here the five tips I use when traveling for business or pleasure.

1. Plan ahead

Winston Churchill said, “He who fails to plan is planning to fail.” The less time you have to plan your trip, the less money you can potentially save.

Use flight and hotel pricing tools like Kayak or [bl id=”1121″]Hotels.com[/bl]. But even better, check with your credit card company's website, as you may get bonus cash-back points for using their affiliate link. For example, I use separate Chase rewards Visa cards for my personal expenses and business expenses. Chase offers up to 500% more reward points (on top of the 1% baseline) for certain affiliates. That's a potential 6% savings!

Additionally, mobile apps can help you optimize your travel experience. For example, check gas price on your automobile travel route with Waze or GasBuddy and know where you should stop to fill up at the best prices.

Savings: $200 or more

2. Buy groceries instead of dining out

Food is usually the third biggest expense for traveling, after transportation and lodging. Dine out while traveling and you could easily spend $50 per day per person!

When my wife, Jenny, and I attended New Media Expo in Las Vegas, we got on Google Maps and found local grocery store. A quick (and fun) shopping trip resulted in more groceries than we would actually eat, but for less than the cost of eating out in a single day! We shopped at 99 Market, which is an Asian grocery store, so we found lots of exciting things to try. We ended up saving a couple hundred dollars during our one-week stay.

Another benefit to buying groceries instead of dining out is that we ate a lot healthier. Instead of fattening and oversized meals and drinks, we had fresh fruits, salads, and breads.

Savings: $40 per day

3. Pack light and bring carry-ons instead of checked luggage

Checked luggage is now a luxury on most flights and could easily cost $50 per person roundtrip! Now, I travel as light as possible and fit everything into a carry-on and laptop bag.

I know this one could be a lot more challenging for ladies, as they have more needs. But I don't think it would be impossible.

Guys, an easy way to do this is to bring enough pants to wear three days at a time, a T-shirt for every day, and a dress shirt (for business casual needs) for every two days. If you're attending a conference where T-shirts may be handed out, take a risk and plan to wear a provided T-shirt.

Here's the clothing I pack when I travel for a week (six nights).

  • One pair of shoes
  • Seven pairs of socks
  • Seven pairs of underwear (no reversing here!)
  • Four T-shirts (I assume I'll get two free while I'm there)
  • Two pairs of pants
  • Three dress shirts

Another step to packing light could be in the devices you bring. I have a 17″ MacBook Pro that requires a carrying case, power adapter, and mouse. But I can reduce this to an iPad with Bluetooth keyboard (I recommend the [easyazon_link asin=”B00EZ9XGE4″ locale=”US” new_window=”default” nofollow=”default” tag=”danieljewls-20″ add_to_cart=”default” cloaking=”default” localization=”default” popups=”default”]Logitech Ultrathin Keyboard Cover[/easyazon_link] or the [easyazon_link asin=”B00EOE4G4E” locale=”US” new_window=”default” nofollow=”default” tag=”danieljewls-20″ add_to_cart=”default” cloaking=”default” localization=”default” popups=”default”]Belkin QODE Ultimate Wireless Keyboard and Case[/easyazon_link] for any kind of iPad).

Savings: $40–$50

4. Use an airport shuttle instead of a taxi

Taxis are expensive, especially in traffic. Find out if your lodging provides its own airport shuttle. If not, make reservations with the local shuttle service. You can usually find a quick trip for less than half the cost of a taxi.

Visit RetailMeNot.com ahead of time to find a coupon code and reserve your shuttle online to save a few more dollars.

Savings: $25

5. Walk instead of riding

You may have some leisure time to explore the area. Some hotels provide free roundtrip transportation to local attractions, which can save your legs and money. But for everything else, try to resist taking a taxi or other paid transportation!

If the weather is bearable and it's safe for you to walk, get your blood pumping and your legs moving!

This will not only save the taxi fare, but it will also keep your energy levels and health higher as you probably spend most of the day sitting.

Savings: $10 per day

How do you save money traveling?

Please comment with how you save money traveling. I'd love to see your ideas!

Filed Under: Business, Family, Money Tagged With: money, saving, travel

Why I switched from Springpad to Evernote before I had to

August 15, 2014 by Daniel J. Lewis Leave a Comment

Switch-from-Springpad-to-Evernote

I used to be a diehard fan of Springpad and a hater of Evernote. I was even a guest on the Beyond the To-Do List podcast praising Springpad (although that was shortly after I started my transition).

What are Evernote and Springpad?

Evernote and the late Springpad were designed to help you remember things. Evernote was simple with notes that could contain text, links, images, and audio.

Springpad was a lot more intelligent with note types that could be recipes, products, videos, images, people, and much more. Each Springpad note type could have its own fields, options, and intelligence. For example, I could scan a book's barcode with Springpad and it would load the book's photo, description, best price, and link to Amazon.com.

Springpad wanted to be your personal assistant, Evernote wanted to help you remember everything (thus its elephant logo).

Alan Henry wrote on Lifehacker that you could even use Evernote and Springpad together.

But I couldn't settle for having my information in two places, so I made the switch and even upgraded to Evernote Premium. So I switched to Evernote long before Springpad shut down. Here are my reasons for switching and why I use Evernote for managing information.

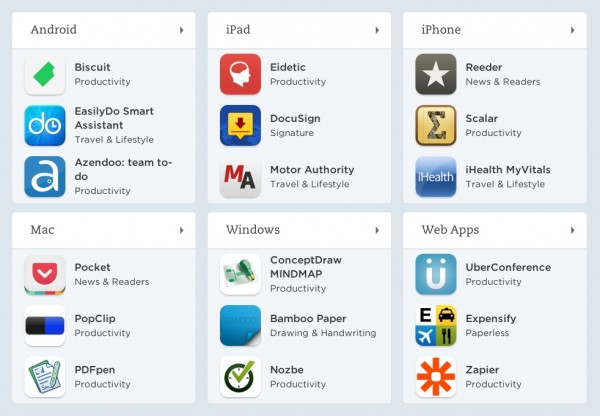
Evernote integrations and apps

1. Evernote has integration, Springpad didn't

Integration was a huge feature to me. It seemed like everything could integrate with Evernote! If This Then That (IFTTT), email apps, RSS readers, to-do lists, writing apps, and more. Besides integrating with other apps, Evernote could even integrate with my own device better. I was initially creeped out when I started a note at the Mixwest conference and Evernote accurately titled the note “Note from Mixwest” because it had looked at my current calendar event.

I was commonly frustrated by Springpad's lack of integration with almost anything. The best Springpad could offer was adding to notebooks via email, which was very limited.

Evernote Desktop App on Mac

2. Evernote has a desktop app, Springpad didn't

A desktop app may not seem that important until you consider features like offline use, quick startup (especially if your browser has to launch a bunch of tabs), and even local search integration (OS X's Spotlight search would search inside Evernote notes).

Springpad was web and mobile only. I would either have to visit their website (which logged me out far too often) or use the mobile app. If I was offline, I had no ability to make or access my notes.

Evernote rich text formatting on iPad

3. Evernote has rich text formatting on mobile, Springpad originally didn't

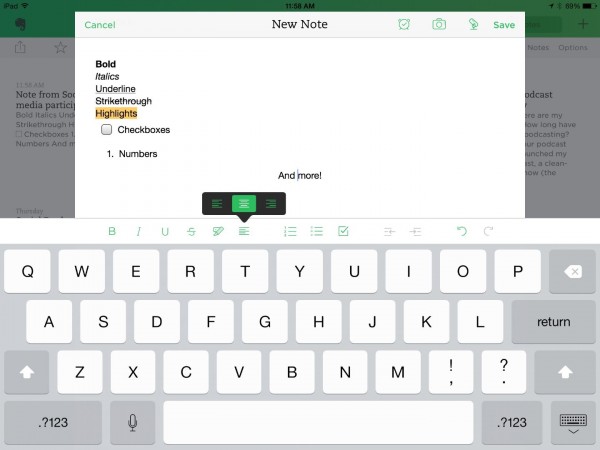
Rich text formatting (RTF) is something we take for granted in most apps—the ability to bold or italicize something, change to bullets and numbers, indent, color, and more. Depending on your writing style for taking notes, RTF may be necessary for your notes to make any sense.

I started using Evernote more seriously because of its RTF. I loved the ability to make bullet points in multiple levels, which made taking conference notes really easy.

Springpad used a Markdown hybrid. That could seem great until you think about typing special characters like hyphens and asterisks on a touchscreen keyboard.

4. Evernote was simple; Springpad was complicated

I liked Springpad for its intelligence and various note types. But this intelligence made things complicated. It was impossible to change a note from one type to another, such as from a book type to a note type, or vice versa. Sometimes, things would be added as the wrong type, which meant having to re-add the note to pick the right type.

Evernote keeps things simple. A single note can contain any kind of information, formatted in many ways. A note can have an assigned URL, contain a photo or contact information, or almost anything that I wanted.

5. Evernote was fast, Springpad was slow

Adding or searching for notes on Evernote—web, desktop, or mobile app—is fast, even with a massive catalog of notes. But Springpad always seemed sluggish to me, especially on mobile (Android or iOS). It was common for me to delay a group because Springpad was working slowly to add my notes.

6. Evernote worked all the time, Springpad worked most of the time

Springpad could sometimes correctly recognize products from their covers or barcodes, and then enter the title automatically. This was great, but it worked only about half of the time. I actually had a progression of backup methods for adding things—scan the barcode; if that didn't work, then search for the product; if that didn't work, add the product manually.

Evernote simplifies this and just works. Although I wouldn't get the luxury of scanning barcodes and automatically entering text, Evernote could take a picture and make the text in that picture searchable—even for handwriting!

Evernote icon

If you need to organize and remember stuff, try Evernote!

I like to describe Evernote as a blank canvas. You can create whatever “art” of information you want—plain text, bookmarks, photos, files. You can now attach reminders to any of these.

Evernote has a lot to offer, so try it today! If you find it really useful, as I did, upgrade to get more storage, security, and more.

Filed Under: Productivity, Technology Tagged With: apps, Evernote, iOS, mobile apps, productivity, Springpad

  • « Previous Page
  • 1
  • …
  • 5
  • 6
  • 7
  • 8
  • 9
  • …
  • 17
  • Next Page »
  • Home
  • About me